Diptych:
A diptych of two images, or parts of two images, is an impactful storytelling tool. Look for thematic, compositional, and other visual interactions that will make your diptuchs more powerful than the sum of their parts.
Egyptian Memory, 1983
http://www.gilleslarrain.com/series/diptychs/
Our project was called Paradox and Pairing. We all had to share an image on moodle and our job was to find an image from another student and make as diptych. We was not allowed to use our own images.
Lola’s image: I really liked this and wanted to continue with the story.
My final image that I chose. it took me three attempts to create an image that I thought would work perfectly.
Put them both together and I really like the composition and how I managed to get certain simularities. Everytime I look at this diptych I always imagine the singer on the left saying “Look mum….I can be just as cool!” While the lady on the left is the mum who takes no notice and carries on with her work.
That wasn’t our only experiment.
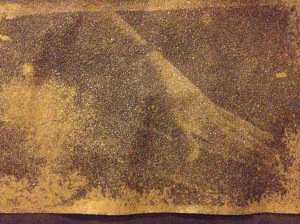
We were shown how to use liquid light and what materials that it could be used on. I wanted to know if it was possible to print from a negative using liquid light on sandpaper. My tutors didnt know if this was possible as it was something they hadnt done. This made me even more determined to prove that there is a way to make it possible.
I had to wait for the liquid light to dry on the sandpaper which actually took quite a bit longer than most materials. once it had though, I took my test strip and re-checked the exposure times. I had already done this on resin paper as normally the exposure reading on resin is almost the same as using liquid light give or take one or two stops.
I am glad I did re-test as on sandpaper my exposure time needed to be upped by three stops.
When I put my test strips into the developer though no image started to appear even after a couple of minutes. I was disappointed but wasn’t ready to give up. It was only by chance that I put my last test strip into the developer and left it there even longer as I was also clearing away. When i went back to check my test strip which had been in nearly four minutes i noticed an image starting appearing very quickly and i had to the pull the test strip out within 20-30 seconds. It worked, you can print on sandpaper.
I did the usual next steps, water, (Not stop for some reason!) then placed into old fix for one minute and then new fix for four minutes.
Below is my outcome:
I was so pleased with this experiment. The only thing I found a little frustrating is that when i went to wash the print, the liquid light started peeling away from the sandpaper and i had to quickly remove it. I dont knowhow long this print will stay or whther it will fade, or whether the chemicals that couldnt be washed off affect it in other ways. I was thinking of covering the image with a layer of varnish and hope that it will keep the image from fading.
Above: I continued to practice using different kinds of sandpaper. This is another project that I would really like to concentrate on and work with when I have some spair time.


Love your ideas for this project…
LikeLike